Using the example of the catalog of homeless cats from the Google documentation.
On March, 26 Google announced support for AMP technology for interactive messages in Gmail.
Accelerated Mobile Pages (AMP) is the technology developed by Google in 2015. It allows you to load pages at a higher speed, improving the user experience.
However, AMP has a much broader scope of use. For example, companies can “broadcast” ads and current offers from their website through different platforms and applications, while maintaining full control over the information posted.
One of these platforms is now email. AMP allows you to make letters more interactive.
The recipient can respond directly to comments in Google Docs, manage subscriptions, give feedback, accept invitations to events, take polls and book tickets — and you don’t need to go to external websites. Information in the letters will be updated automatically, displaying the latest comments and recommendations.
The dynamic components of AMP provide interactivity: these can be images (that one can enlarge) and show a detailed description when you click on them, as well as carousel ads, accordion lists, and other elements.
In addition to Gmail, AMP technology was implemented by such mail services as Yahoo Mail, Outlook and Mail.Ru.
Advantages of AMP-mailing:
- The ability to interact with the content, without going to third-party sites.
- Relevance and automatic info updates, the server retrieves the actual content from remote endpoints.
- Significant personalization.
- Security: AMP-letters do not interact with third-party services, do not allow the use of advertising components and only give access to the specified (proven and secure) functions.
- Compatibility and scalability. AMP letters are compatible with classic emails.
Outline
Writing your first AMP letter
The AMP team created an environment for Gmail where you can develop, test, and send AMP letters to yourself — AMP4Email.
To use the service, you need to log into your Gmail account and make sure the line “Hello, AMP4Email world” is displayed in the upper right corner.
AMP4Email
All the necessary markup and the minimum code to create a valid AMP-letter are in the workspace.
<!doctype html>

<html ⚡4email>

<head>

<meta charset="utf-8">

<script async src="https://cdn.ampproject.org/v0.js"></script>

<style amp4email-boilerplate>body{visibility:hidden}</style>

</head>

<body>

Hello, AMP4EMAIL world.

</body>

</html>
Primary “identification marks” of AMP letters:
- They marked with “⚡4email” or “amp4email” in the <html> tag.
- The <head> tag must contain a <script> tag that loads the AMP runtime: <script async src = “https://cdn.ampproject.org/v0.js”> </ script>.
- The boilerplate must be loaded on CSS, it will hide the content before loading AMP: <style amp4email-boilerplate> body {visibility: hidden} </ style>.
If you have previously worked with mailing lists, the script in the letter can put you on the alert.
Google developers advise not to worry: email services that support AMP provide high security and allow you to run only proven AMP scripts for authorized components.
Adding an Image
Most HTML tags used in regular emails can also be used in AMP emails. However, some tags like <img> are replaced by equivalents: <amp-img>.
<amp-img src =”https: //link/to/img.jpg” alt =”photo description” width=”100″ height =”100″> </ amp-img>
For the <amp-img> tag, you must specify the width and height of the image. In addition, you must use the closing tag </ amp-img>. GIFs are supported via <amp-anim>.
Since the letters not stored on your server, you must use an absolute path with the HTTPS protocol to specify the URL.
You can choose the size of the image directly in the URL through the Placekitten service, which “fills” places for future pictures with kittens.
Add an image to your email using the following code:
<body>
<amp-img src =”https://placekitten.com/800/400″
alt =”Welcome”
width=”800″
height=”400″>
</ amp-img>
</ body>
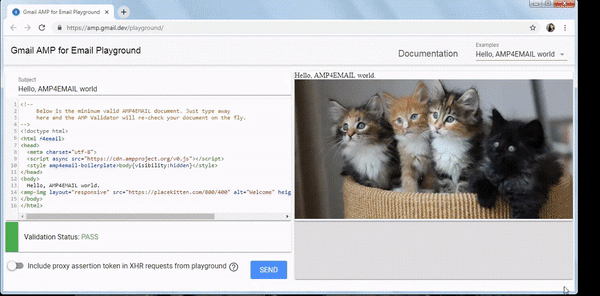
Making letters responsive
Email can be opened on different devices with different screen sizes. AMP has a built-in layout system for this.
The amp-layout system and media queries make it easy to create responsive emails. To adjust the image to the desired screen size, add the layout = “responsive” attribute to <amp-image>.
<amp-img layout =”responsive” src =”https://placekitten.com/800/400″ alt =”Welcome” height=”400″ width =”800″> </ amp-img>
Stretch or squeeze the browser window, and you will see the image changing size — the list of elements available in the amp-layout system listed in the documentation.
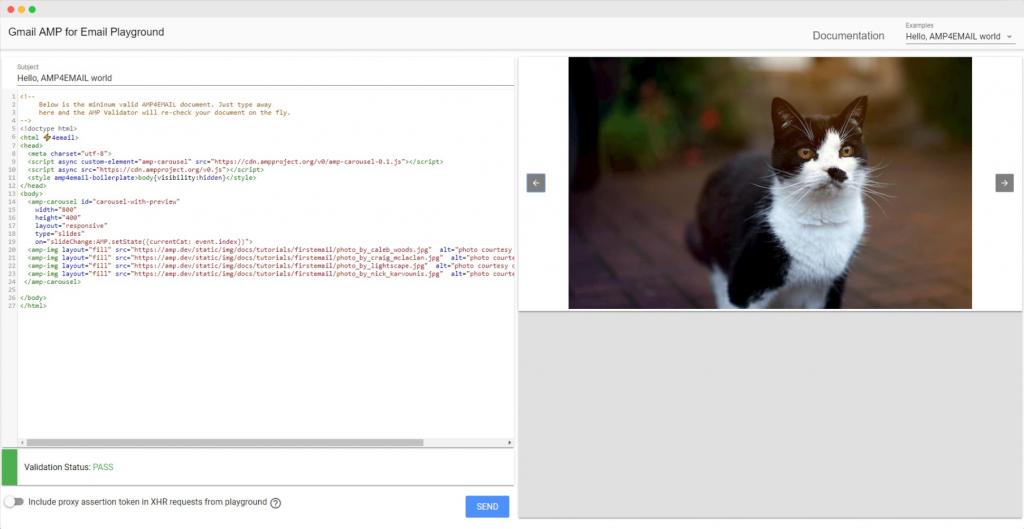
Modifying the presentation and layout
One image is satisfactory, but what if you need to insert multiple elements? AMP supports items such as accordions (vertically stacked list of things) and side panels.
Here we use the tag <amp-carousel> to make a gallery with shelter cats.
To insert a carousel, add the amp-carousel script inside the <head> tag:
<head>
…
<script async custom-element=”amp-carousel” src=”https://cdn.ampproject.org/v0/amp-carousel-0.1.js”> </script>
…
</head>
Then place the previously attached image of the cat between the <amp-carousel> tags:
<amp-carousel layout =”responsive”
width=”800″
height=”400″
type =”slides”>
<amp-img layout =”fill” src =”https://placekitten.com/800/400″ alt =”Welcome” height=”400″ width =”800″> </ amp-img>
</ amp-carousel>
If nothing has changed, this is a good sign. The carousel has the specified attribute type = “slides,” which means that it will show one photo at a time. And since you added only one image so far, the navigation arrows do not appear.
Replace the test image from Placekitten with the desired image inside the <amp-carousel>:
<amp-carousel id =”carousel-with-preview”
width=”800″
height=”400″
layout =”responsive”
type =”slides”
on =”slideChange: AMP.setState ({currentCat: event.index})”>
<amp-img layout=”fill” src=”https://amp.dev/static/img/docs/tutorials/firstemail/photo_by_caleb_woods.jpg” alt=”photo courtesy of Unsplash”> </amp-img>
<amp-img layout=”fill” src=”https://amp.dev/static/img/docs/tutorials/firstemail/photo_by_craig_mclaclan.jpg” alt=”photo courtesy of Unsplash”> </amp-img>
<amp-img layout=”fill” src=”https://amp.dev/static/img/docs/tutorials/firstemail/photo_by_lightscape.jpg” alt=”photo courtesy of Unsplash”> </amp-img>
<amp-img layout=”fill” src=”https://amp.dev/static/img/docs/tutorials/firstemail/photo_by_nick_karvounis.jpg” alt=”photo courtesy of Unsplash”> </amp-img>
</amp-carousel>
Now you can scroll through the pictures by clicking the arrows on the right and left sides carousel
Adding style
AMP allows you to define the style of the document header with the <style amp-custom> tag. Besides, previously forbidden CSS classes and pseudo-classes are now available (see the list of documentation for them).
Change the text “Hello, AMP4EMAIL world” to the real title:
<body>
<h1> Adorable Adoptable Animals </h1>
…
</body>
Select a heading style:
<head>
…
<style amp-custom>
h1 {
font-family: arial;
margin: 10px;
}
.center {
text-align: center;
}
.carousel-preview {
margin-top: 10px;
}
</style>
</head>

Adding dynamics
AMP allows you to add different dynamic elements. Add the names and descriptions of the cats, and then use the <amp-bind> tag so that they change when you click on the next image in the gallery.
First, add the amp-bind script inside the <head> tag:
<head>
…
<script async custom-element=”amp-bind” src=”https://cdn.ampproject.org/v0/amp-bind-0.1.js”> </script>
…
</head>
Then declare the myState binding variable as JSON inside the <amp-state> tag. If there are four cat photos, then the state parameter (“state”) must be enabled for each of them.
<body>
…
<amp-state id=”myState”>
<script type=”application / json”>
{
“cats”: [
{
“name”: “Aakash”,
“description”: “It is quite a shy environment in a shelter environment. Lovebug.”
},
{
“name”: “Filip”,
“description”: “Friendly and enjoys pets and head rubs.
},
{
“name”: “Julian”,
“description”: “Both bold and extremely sweet. Wastes no time in investigating new sun, objects and lysing in the sun!”
},
{
“name”: “John”,
“Description”: “This is a cat that will be happy.”
}
]
}
</script>
</amp-state>
</body>
AMP actions and events trigger various states. In our case, we want to update the state when the user clicks on the navigation arrows of the carousel.
Amp-carousel triggers slideChange event, which updates the variable currentCat, using AMP.setState.
<h1> Adorable Adoptable Animals </h1>
<amp-carousel id=”carousel-with-preview”
width=”800″
height=”400″
layout=”responsive”
type=”slides”
on=”slideChange: AMP.setState ({currentCat: event.index})”>
<! — images of cats –>
</amp-carousel>
Thanks to this code, the currentCat status of a cat’s photo correspond to the carousel index. Thus, if we are at the event.index = 2 slides, the state will correspond to the item at index 2 of the given array.
The only thing left to display is the name and description of our cat. Add this code after the amp-carousel closing tag:
</amp-carousel>
<div class=”center”>
<h1>
<span [text] =”myState.cats [currentCat] .name”> Aakash </span> is available for adoption!
</h1>
</div>
The amp-bind extension uses expressions and bindings to change content dynamically. In the example above, the [text] binding updates the text in the <span> tag with each state change (the need for update is determined by the expression myState.cats [currentCat] .name).
Do not forget to add the description of the cat after the </ div> tag:
</ div>
<p class=”center”> About <span [text] =”myState.cats [currentCat] .name”> Aakash </ span> </ p>
<p class=”center” [text] =”myState.cats [currentCat] .description”> Very sweet gentleman that is quite shy in a shelter environment. He may hide under his blanket upon initial uproach, but he is an affectionate lovebug.</p>
Now, when you change a cat photo on the carousel, their names and descriptions change accordingly.

Full code:
<!doctype html>
<html ⚡4email>
<head>
<meta charset=”utf-8″>
<script async src=”https://cdn.ampproject.org/v0.js”></script>
<script async custom-element=”amp-bind” src=”https://cdn.ampproject.org/v0/amp-bind-0.1.js”></script>
<script async custom-element=”amp-carousel” src=”https://cdn.ampproject.org/v0/amp-carousel-0.1.js”></script>
<style amp4email-boilerplate>body{visibility:hidden}</style>
<style amp-custom>
h1 {
font-family: roboto;
margin: 10px;
}
.center {
text-align: center;
}
.carousel-preview {
margin-top: 10px;
}
</style>
</head>
<body>
<h1>Adorable Adoptable Animals</h1>
<amp-carousel id=”carousel-with-preview”
width=”800″
height=”400″
layout=”responsive”
type=”slides”
on=”slideChange:AMP.setState({ currentCat: event.index} )”>
<amp-img layout=”fill” src=”https://amp.dev/static/img/docs/tutorials/firstemail/photo_by_caleb_woods.jpg” alt=”photo courtesy of Unsplash”></amp-img>
<amp-img layout=”fill” src=”https://amp.dev/static/img/docs/tutorials/firstemail/photo_by_craig_mclaclan.jpg” alt=”photo courtesy of Unsplash”></amp-img>
<amp-img layout=”fill” src=”https://amp.dev/static/img/docs/tutorials/firstemail/photo_by_lightscape.jpg” alt=”photo courtesy of Unsplash”></amp-img>
<amp-img layout=”fill” src=”https://amp.dev/static/img/docs/tutorials/firstemail/photo_by_nick_karvounis.jpg” alt=”photo courtesy of Unsplash”></amp-img>
</amp-carousel>
<div class=”center”>
<h1>
<span [text]=”myState.cats[currentCat].name”>Aakash</span> is available for adoption!
</h1>
</div>
<p class=”center”>About <span [text]=”myState.cats[currentCat].name”> Aakash</span></p>
<p class=”center” [text]=”myState.cats[currentCat].description”>Very sweet gentleman that is quite shy in a shelter environment. He may hide under his blanket upon initial approach, but he is an affectionate lovebug.</p>
<amp-state id=”myState”>
<script type=”application/json”>
{
“cats”: [
{
“name”: “Aakash”,
“description”: “Very sweet gentleman that is quite shy in a shelter environment. He may hide under his blanket upon initial approach, but he is an affectionate lovebug.”
},
{
“name”: “Filip”,
“description”: “Friendly and enjoys pets and head rubs. Is known to sit on keyboards and refuses to touch anything with catnip on it.”
},
{
“name”: “Julian”,
“description”: “Both bold and extremely sweet. Wastes no time in investigating new smells, objects, and places, but enjoys lazing in the sun!”
},
{
“name”: “John”,
“description”: “This playful and spirited cat would like to be outside his kennel and will be so happy when he gets to his forever home with more room to move.”
}
]
}
</script>
</amp-state>
</body>
</html>
To sum it up on Google AMP email sending
The AMP4Email tool has a built-in validator. If the markup is valid, the system will allow you to send an email to the mailbox associated with your Google account. For this you need:
- To go to your email, without closing the tab with AMP4Email.
- Go to “Settings” → “General” → “Dynamic email” → “Dynamic email development.”
- Enter amp@gmail.dev into “Sender email address” field.
- After this, return to the AMP4Email tab and click the “Send” button.
Congratulations! You have just sent your first AMP letter.